Using the Pexip Secure Meetings for Justice admin portal
This page provides an overview of the Pexip Justice portal where administrators can manage hearings and scheduling tasks such as creating participants, editing the email invite template, and configuring authentication.
- Calendar view
- Hearings
- Participants
- Meeting settings: Roles, languages, alias templates, SSO providers, themes, layouts, RTMP streams, email template.
- Global settings: SMTP server, authentication, users, OAuth2 Clients, OAuth2 Tokens, feature groups, access groups, licenses, general settings, Scim auth tokens.
- Scheduling a hearing
- Interpretation
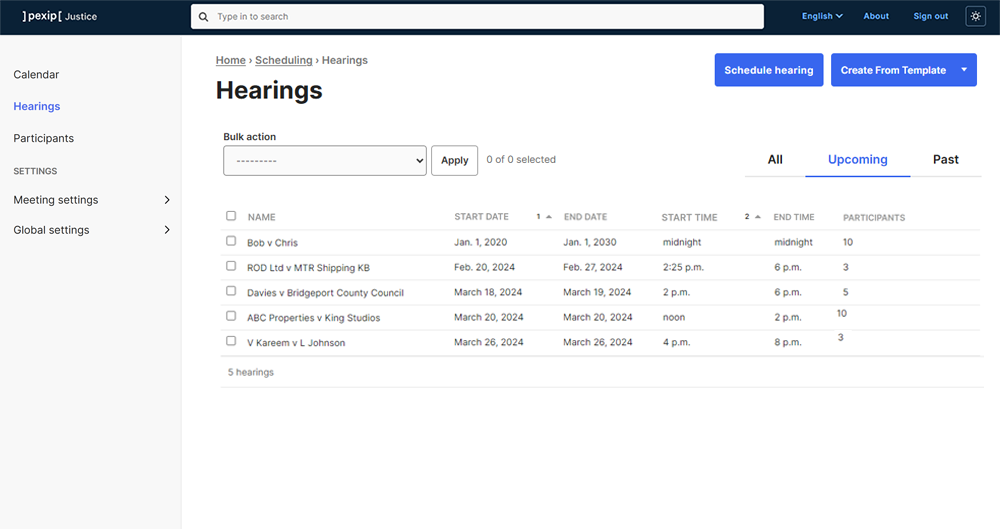
Example of the Pexip Justice portal showing a list of simulated scheduled hearings
Calendar view
The Calendar view shows only the scheduled hearings that you have been assigned to as a participant. It matches the email address of your signed-in portal user with users in Participants.
You can join a hearing directly from the Calendar view.
Hearings
The Hearings page shows all hearings that you have been assigned to, or have access to view and/or edit based on permissions set by Access groups (Global settings) or administrator status. You can find details of all scheduled hearings, including hearings that have already finished. You can create a new hearing and edit or delete scheduled hearings.
Before scheduling a hearing, you must create Participants and Roles, and complete the information required in Settings.
Participants
Participants are the individuals or endpoints that can be selected to attend a hearing. You can add new participants, and edit or delete existing participants. All participants and their details entered in the portal remain here unless manually deleted.
You can optionally synchronize corporate user accounts to the participants list from an Identity Provider such as Microsoft Entra ID. Synchronized participants are tagged as Externally Managed on the participants list. See Using SCIM to synchronize participants for more information.
Creating a participant
To create a participant, go to > and complete the fields as described below.
| Name | The name of the participant. Note that a participant can choose to change their display name at the time of joining the hearing. |
| Enforce display name | Select this box to enforce the use of the name as entered above. The participant can no longer change this at the time of joining. |
| Email address | Email address of the participant. Email invitations to the hearing and any other email communications are sent to this address. |
| Description | Optional. Enter a description of the hearing or any other important information. |
| Dialout alias |
Optional. When specified, this participant alias (for example a SIP endpoint) can be used as an automatically-dialed participant — by enabling the Auto dial option when assigning this participant to a hearing — when a Host joins the hearing. Note that this should not be used for RTMP streaming or recording services; instead you should initiate those services manually from within the hearing. |
| Authentication |
Authentication method: Choose authentication by PIN or SSO. Pin: Enter a PIN which the participant is required to enter when joining the hearing. PINs must use the digits 0-9 only and must be between 4–20 digits long. SSO provider: Select the Identity Provider to use to authenticate this participant. To use this authentication method, at least one SSO provider must be added in . Expected value: The value which is expected to match the configured attribute from the SSO provider. |
When you have entered all the required information, select .
Editing a participant
To edit an existing participant, select the participant from the list, edit and select .
Deleting a participant
To delete an existing participant:
- Go to Participants in the portal.
- Select the participant's name.
- Select the Action drop down and select > .
Meeting settings
A range of hearing-related settings can be applied:
- Roles
- Languages
- Alias templates
- SSO providers
- Themes
- Layouts
- RTMP streams
- Email templates
- Hearing templates
Roles
Add, edit, or delete a role from this page. There can be multiple roles and you can choose to give certain roles host permissions.
When joining a hearing, a host participant enters the main room instead of a breakout room and has control permissions that a guest does not, such as:
- Move people between rooms.
- Rename rooms, add further rooms, or close rooms during the breakout sessions.
- Join any breakout room at any time with access to full audio and video, presentation, and chat capabilities.
- Read all chat messages and events from all breakout rooms at any time, if chat is enabled. Guests can only read the chat messages of the breakout room that they are in.
Languages
Add different languages here if you intend to use the interpretation feature in a hearing.
Alias templates
Alias templates are used to generate the aliases that participants use to dial into a conference.
Every participant assigned to a hearing is given a unique personal alias. The alias is used to identify each user and apply the correct display name, authentication method, and configuration settings. Only admins have the ability to configure the format of the aliases.
An alias template must contain one of the following variables:
-
{{ long_alias }}
This generates a UUID and may be more suitable for WebRTC calls where the alias does not have to be entered manually. Example: 958e52ba-4328-424b-8d77-c18a59f4c1da
-
{{ short_alias }}
This generates a 9-digit number which may be easier to dial from a video endpoint. Example: 958524328
or
Aliases can include a domain or subdomain but this is optional. Aliases can contain numbers, letters, dashes and dots, but do not support wildcards or regular expressions.
SSO providers
Add an Identity Provider if you intend to use single sign-on (SSO) for participant access to a hearing.
Group: the name of the Identity Provider.
Attribute: the value used for authentication, such as email or username.
Themes
The themes available, as configured in Pexip Infinity.
Layouts
The layout view that each participant has of all the other participants in the hearing. Examples and further information about the different views are available here.
RTMP streams
If you want a hearing to be to be streamed as a live event, or recorded and stored for later viewing, you can create an RTMP stream. See streaming and recording for more information about these services.
To enable RTMP streaming with Pexip Secure Meetings for Justice, a configuration change is currently required on your Pexip Infinity deployment. For information on the required change, please contact your Pexip authorized support representative with the reference GH-38804. Note that this modification must be reapplied after every upgrade of your Pexip Infinity platform.
Dynamic stream URLs
Select Dynamic URL if you want to generate the RTMP streaming URL dynamically, based on the properties of the hearing.
When enabled, the Streaming URL is treated as a Jinja template, allowing you to generate dynamic URLs based on the following variables:
- encounter_id
- encounter_name
- encounter_start_date
- encounter_start_time
For example, the Streaming URL could be in the style: rtmps://stream-pexample.com/live/{{ encounter_name }}
All variables used are URL-encoded in the final URL.
Email templates
The subject and content of the email that is sent to all participants. This email usually contains the necessary joining information for the hearing and any other important details that are required before the hearing begins.
Hearing templates
Hearing templates allow you to create a hearing based on previously designed templates that contain preconfigured settings, so that you do not have to adjust all the settings for every new hearing.
To use a template, you must first add one or more templates in . Currently, the hearing templates that you create are personal.
Global settings
A range of globally-applied settings can be configured:
- SMTP server
- Authentication
- Users
- OAuth2 Clients and OAuth2 Tokens
- Feature groups
- Access groups
- Licenses
- General settings
- Using SCIM to synchronize participants
SMTP server
The SMTP server settings required for sending email invitations and communications to the hearing participants.
Authentication
Choose between Local or OIDC authentication. OIDC enables single sign-on (SSO) for users of the Pexip Justice portal. Authentication for the portal is separate to authentication for the Pexip Infinity Administrator interface.
Complete the fields in the portal with the relevant details from your Identity Provider.
If you are required to change the client secret in your Identity Provider configuration at any point, you can update the OIDC client secret field in the portal in .
Users
Users is a list of all authenticated user accounts that have access to the Pexip Justice portal. For each user, you can edit the username and email address, and configure permissions and groups.
- Staff status: The user can log into the admin (portal) site.
- Superuser status: The user receives all admin permissions automatically, without another user having to explicitly assign the permissions.
- External user: An informational field only. This will be false for the default admin user, and true for a user that is created when someone logs in via OIDC.
- Active: The user is treated as active. You can deselect this instead of deleting the account entirely.
- Feature groups: Assign the user to one or more Feature groups, if required.
- Access groups: Assign the user to one or more Access groups, if required.
- Default access group: The access group that objects created by this user will be assigned to by default.
If added to a group, the user will receive all of the permissions of that group.
OAuth2 Clients and OAuth2 Tokens
Here you can add OAuth2 clients that will use OAuth2 to authenticate and authorize user accounts connecting to the Pexip Justice REST API.
Feature groups
Feature groups allow you to restricts a user's editing and viewing capabilities of everything in the portal. For example, you can create a feature group so that users in this group can view participants, but cannot create new participants or edit existing participants.
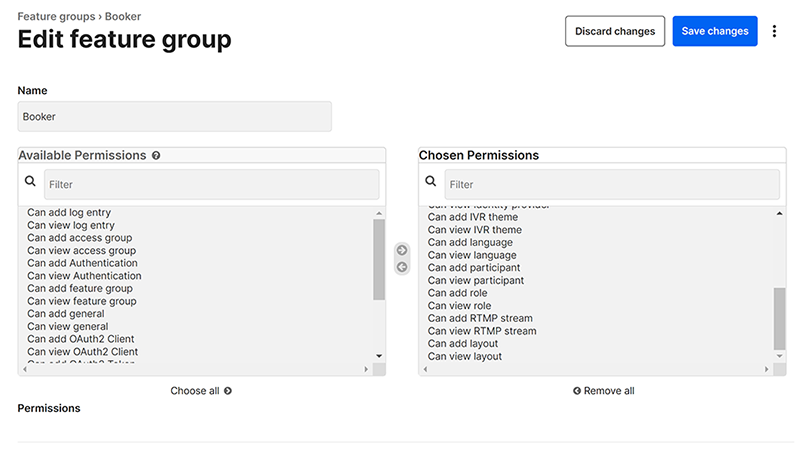
When configuring feature group permissions (), administrators should be aware that by granting someone the Can add feature group and/or Can add user permissions, that person inherently has permission to edit users’ feature groups, potentially resulting in full access to the administrator privileges of the portal. The Can add feature group and Can add user permissions should therefore, be assigned with caution and only to admins who definitely require them.
Access groups
Access groups restrict which hearings are visible for users in particular groups. In , you can configure which access groups have permission to view and edit that specific hearing.
Licenses
Before you can use Pexip Justice, you must a install a system license that permits basic operation of the platform. This is in addition to the call licenses required on Pexip Infinity.
To manage the licenses that are installed on your system, go to .
The top of the page lists the licenses that are installed and the section lists any licenses that were not activated or returned automatically, and are awaiting manual processing.
Network requirements for managing licenses
Before adding, moving, returning or repairing a license:
- You must have an active internet connection from the Pexip Justice appliance (otherwise you must use offline/manual activation).
- License requests are sent to activation.pexip.com. You must therefore configure your firewall to allow a connection from the appliance to activation.pexip.com on HTTPS port 443.
Adding licenses
To add a new license:
- In the admin portal, go to .
- Select .
- In the License entitlement key field, enter the activation key provided by your Pexip authorized support representative.
-
Leave the Manually activate checkbox clear (unless you have been instructed to select this option by your Pexip authorized support representative, or you need to perform a manual activation due to network connectivity issues or for security reasons).
If you are performing a manual activation, follow the same instructions as for Pexip Infinity but perform those operations in the Pexip Justice appliance's admin portal ().
- Select .
The system will automatically generate a file containing the license request. It then attempts to contact the Pexip licensing server and send it this file to activate the license.
- If the license is activated successfully, you are returned to the page and the new license is shown under the section.
- If the activation attempt is unsuccessful (for example, if the system was unable to establish a connection to the Pexip licensing server), or you selected Manually activate, the license is saved as a Stored license request. You must then activate it manually.
License management and troubleshooting
License management on the Pexip Justice appliance works in the same manner as for Pexip Infinity.
- If the system reports an invalid license, this could mean that the license has not been activated, or it has expired.
- If you need to move, return or manually activate a license, follow the relevant Moving a license or Returning a license or Manually processing a stored license request instructions as for Pexip Infinity, but where it refers to the Pexip Infinity Management Node you should perform those operations in the Pexip Justice appliance's admin portal ().
General settings
The following general settings can be configured ():
| Option | Description |
|---|---|
| Grace period | The duration of time when the hearing is active before the start time and after the end time. For example, if the grace period is 10 minutes, participants can join the hearing 10 minutes before the start and 10 minutes after the end of the hearing. |
| Default portal language | The language that is displayed when a user first loads the portal. |
| Default breakout rooms mode | Whether breakout rooms are created manually or automatically for newly created hearings by default. |
| Default webapp URL |
The default URL of the webapp. This is used to generate links to the webapp on the calendar page and in email notifications, and can be referenced via the {{ default_webapp_url }} variable in your email templates. Example: https://pexample.com/webapp3/ |
| Default pin length | The default pin length for newly created participants. |
| Default response type | Sets the default action that occurs when someone dials an unknown alias, or enters an unknown Hearing ID or video address from a Pexip Justice join link. If you set this to continue and someone dials an unknown alias, Pexip Infinity looks for the alias in its internal database. If a matching VMR is located, the call is allowed to continue. If you set this to reject and someone dials an unknown alias, the call is not allowed to continue, even if there is a VMR matching that alias in your Pexip Infinity deployment. |
| Passthrough aliases | If you have an alias registered in your Pexip Infinity deployment that has not been added in your Pexip Justice portal, you can add that alias here so if someone dials the alias from a Pexip Justice join link, the call will be allowed to connect or "pass through". Note that if Default response type is set to continue, then the Passthrough aliases option is removed. |
Using SCIM to synchronize participants
SCIM (System for Cross-domain Identity Management) is an open standard and protocol for automating the exchange of user identity information between different IT systems and applications. SCIM authentication tokens are used to synchronize corporate user accounts to the participants list in the Pexip Justice portal.
We currently support only Microsoft Entra ID as an Identity Provider (IdP), but other IdPs such as Keycloak could be used. Note that changes made in the source system may take up to 1 hour to synchronize to the participants list.
To set up participant synchronization you need to:
- Create a SCIM auth token in the Pexip Justice portal.
- Create a Microsoft Entra application, set up provisioning configuration with the SCIM auth token and assign the users/groups to synchronize.
These processes are described in more detail below.
Creating a SCIM auth token in the Pexip Justice portal
- Go to in the Pexip Justice portal.
-
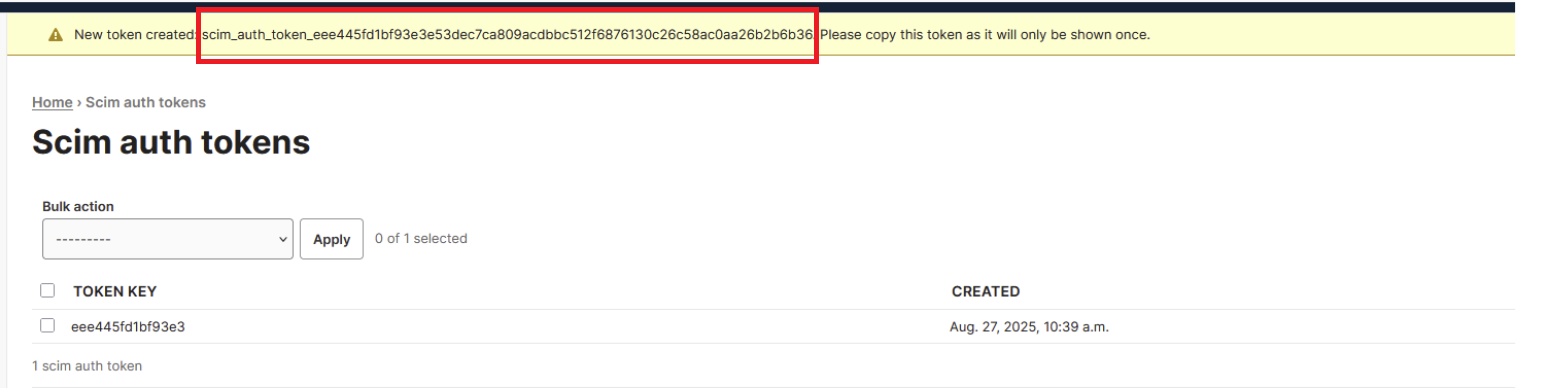
Select .
The page updates and a "New token created" banner message is displayed at the top of the page.
-
Copy the full token key from the banner message. You will need this when setting up the Microsoft Entra application.
The key starts with scim_auth_token_ and is displayed only once. You need to copy the whole key.
Creating a Microsoft Entra application
You need to create a Microsoft Entra application and set up the users / user groups you want to synchronize to the participants list in the Pexip Justice portal.
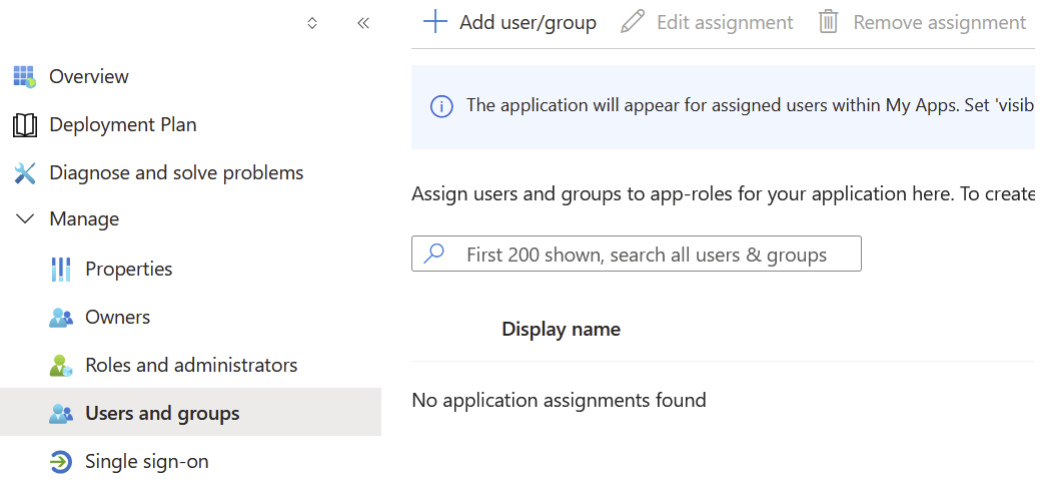
- From the Azure portal select .
- Give the application a suitable name and select .
- When the application has been created, select .
-
Select .
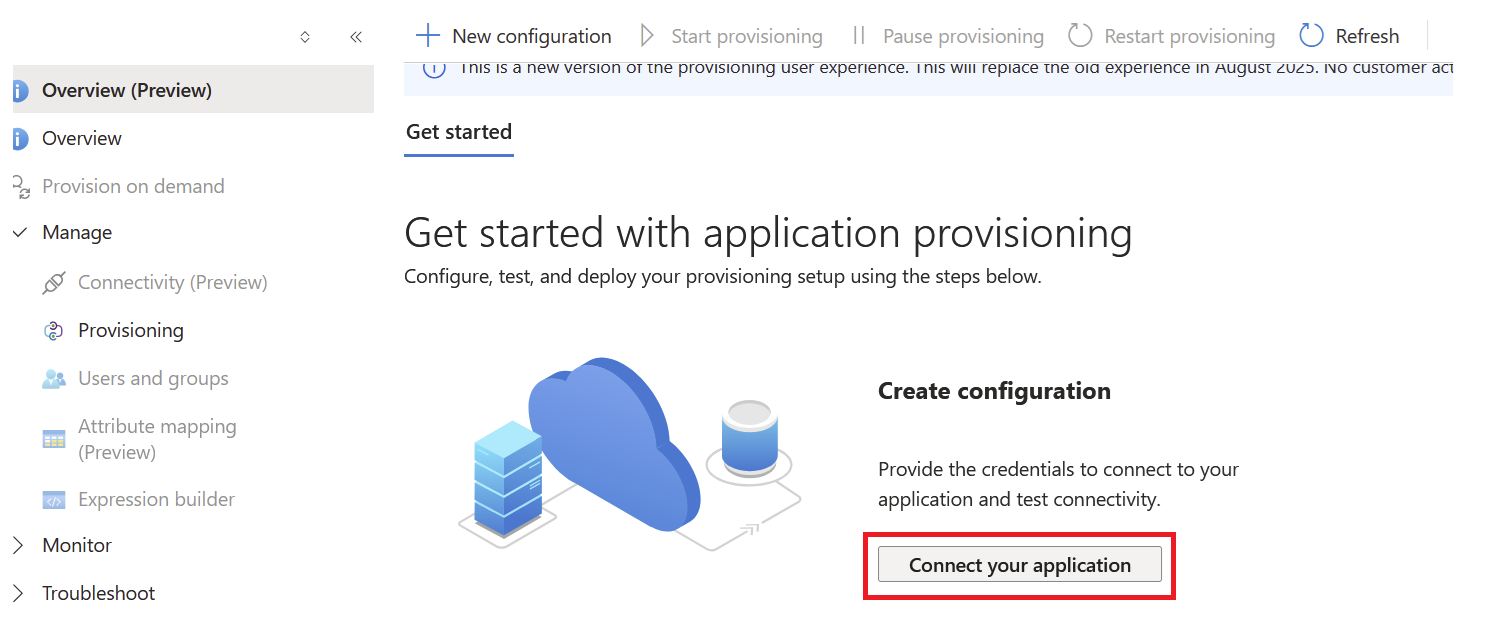
-
Complete the following admin credentials fields:
- Tenant URL: enter https://<your-domain>/scim/v2/ (replace <your-domain> with your domain).
- Secret token: enter the full SCIM auth token you created in the Pexip Justice portal.
- Select . On success you can select .
-
Select and add the users and/or groups that you want to synchronize.
Scheduling a hearing
To schedule a new hearing, log in to the Pexip Justice portal and go to .
Select or and complete the fields as described below. The settings are spread across three tabs:
- : for the time, date and participants.
- : to apply any changes to hearing settings from the default values or from the selected template.
- : to set up breakout room for the hearing.
| Option | Description |
|---|---|
| Name | The name or title of the hearing. This is visible in the portal and email template. We recommend that hearing names do not contain any sensitive information. |
| Meeting details | |
| Start and end times |
This section sets the schedule for the hearing:
|
| Enable interpretation |
Select this to add interpretation functionality and settings to the hearing. You can then assign the Main language spoken in the hearing. See Interpreter settings for more information. |
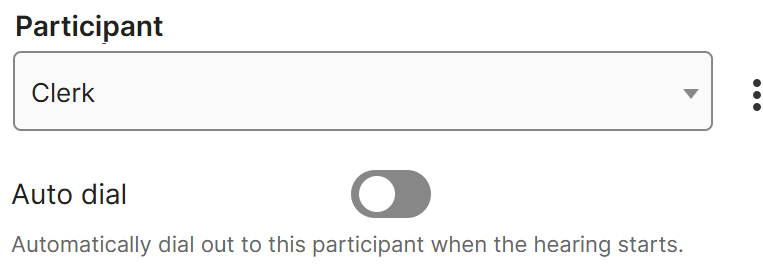
| Hearing participants |
Select a Participant from the drop down list and choose a Role to assign to the participant. If the participant is configured with a Dialout alias then an Auto dial option appears. If Auto dial is enabled the system will automatically dial out to this participant alias when a Host participant joins the hearing.
You can select to add more participants. |
| Additional settings | |
| Description | The description of the hearing or any other information required. |
| RTMP streams | Select one or more RTMP streams for the hearing if live streaming is required. |
| Guest options |
Select the features that guests may use during the hearing:
|
| Ad hoc participants |
A participant that joins via an ad hoc alias is classified as an ad hoc Guest and is placed into a locked waiting room until a Host admits them into the main VMR. They do not have to enter any credentials. Ad hoc participants can be useful when you do not know who, specifically, is going to join the meeting. You can either enter the Alias manually or use to automatically create a suitable alias. For example, if you create 123456789 as an alias, an ad hoc participant can go to the hearing link that has been sent to them manually, enter any name, and then enter 123456789 as the Hearing ID. Currently, there is no automated way to send hearing invitations to ad hoc participants; you must do this manually. There is, however, an |
| VMR settings |
Select the VMR properties to apply to the hearing:
|
| Permissions | Configure which Access groups have permission to view and edit this hearing. |
| Breakout rooms | |
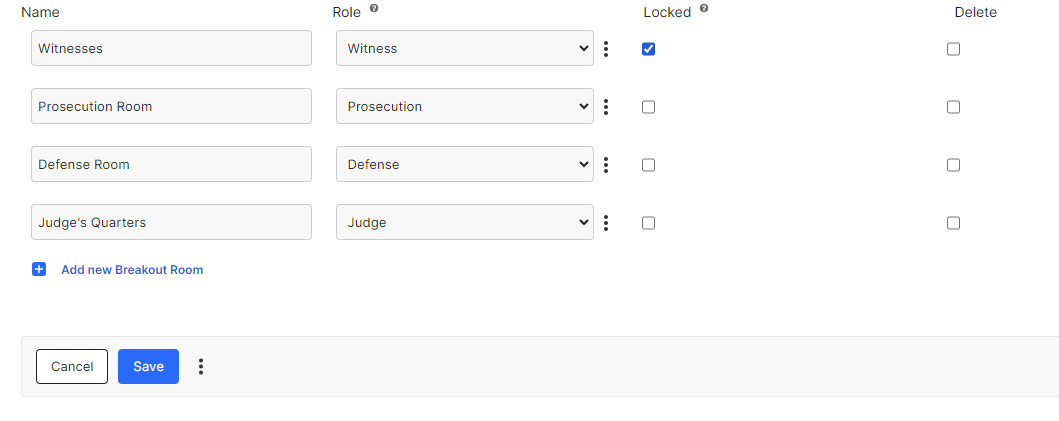
| Breakout rooms |
Breakout rooms are the separate meeting rooms for different participants in the hearing. When you create a breakout room, you must give it a Name and assign a Role to the room. Participants with this role will enter this breakout room when they join the hearing. The example below shows four breakout rooms, one for witnesses, prosecution, defense, and judge.
Select Locked to cause all participants to remain in a waiting room upon entering this room until they are granted entry by a Host participant. Participants in the waiting room cannot hear or see each other. Participants with roles that have not been assigned to a breakout room at the time of scheduling enter a locked Guest breakout room upon joining the hearing. |
When you have completed all required fields, select .
Interpreter settings
Interpretation provides a specific layout and setup allowing for live translation of a conference to a non-native speaker by one or more interpreter participant(s). Interpreters and non-native speakers have full video of the main room but are simultaneously assigned to a personal breakout room where interpretation occurs.
When joining the hearing, interpreters and their paired participants are sent to their own personal breakout room, not the breakout room that the participant’s role was configured with. When the hearing starts, the interpreter and participant are cascaded into the main room, meaning that they are grouped together in the video slot.
The interpreter can choose which direction they are interpreting, so that the current speaker in the main room only hears the interpreter at a reduced volume when they are interpreting to the non-native speaker.
The interpreter can also choose to mute their outgoing audio towards the main room so that they can only be heard by the non-native participant.
Configuring interpretation
Before configuring interpretation settings, ensure that you have added languages in Settings > Languages. All languages that will be used and translated in the hearing, including the primary language in the main VMR, must be added here first.
In Roles, each Role has an Interpreter checkbox. Enable Interpreter for the role or roles that will be acting as an interpreter.
On the Hearing configuration page, go to Interpreter settings where you can enable interpretation and assign languages.