Advanced Pexip web app branding and customization
Most customization requirements for the Pexip web app can be implemented by using the Pexip branding portal to generate a package of branding files and then applying that branding by uploading the branding package to the Management Node (see Customizing and branding the web app). However, for advanced customization requirements you may need to make manual changes to the branding files.
You may also need to manually customize these files if you are hosting the web app on an external server or reverse proxy. For information about how to apply customized branding in this situation, see Hosting the Pexip web app externally.
Note that manual configuration requires knowledge of core web-design technologies such as HTML, JavaScript and CSS.
This topic covers how to manually customize the current Webapp3. For information about customizing Webapp2, and the legacy desktop client, refer to the v36 documentation.
Hosting on the Conferencing Nodes
The standard method for applying branding to the Pexip Infinity platform is to upload a branding package to the Management Node and associating the package with a unique web app path. The package is then pushed out to all Conferencing Nodes, from where those customizations are served to all web app users joining using that path.
Each web app version requires separate branding customizations. You can create multiple unique paths where each path is used to host different combinations of web app version, revision and branding.
Branding customizations that are applied to the web app via the Management Node will persist over upgrades to subsequent versions of Pexip Infinity software (although you may need to adapt the customization to cater for any new features when upgrading to a new major release).
Manually customizing Webapp3
This section describes how to manually customize the current web app, Webapp3. You do this by manually creating a customized client branding package, uploading it to the Management Node, and then specifying the web app path used to access the branding.
The complete set of files that can be included in a branding ZIP package for upload via the Management Node, or manually copied into the branding directory when hosting the app on a different server, are summarized below, and are then explained in more detail in the subsequent sections:
-
The manifest.json controls which customized settings take effect. It also contains the application and default user settings.
The manifest.json file is the only mandatory file. Your customizations will not take effect if this file is not included.
- landing page background image
- jumbotron image
- logo
- participant background image
- any new or edited language files
- the content shown in the body of the custom step (if enabled)
When creating your branding package ZIP file, ensure that manifest.json and any of the optional files listed above that you are including are contained in a webapp3/branding folder inside the ZIP file for uploading to the Management Node.
When editing the configuration files, you must use a text editor that does not apply "smart quotes" or make any automatic text changes, as the files are sensitive to correct formatting. Use a code editor or simple file editor instead of word processing software.
Application manifest (manifest.json)
The manifest.json file controls which customized settings take effect, and which image files are used. When customizing Webapp3, you must include the manifest.json file in the webapp3/branding folder (creating it, if necessary, in the first instance).
This file must use correct JSON syntax, otherwise it will fail validation when uploaded to the Management Node. We recommend that you use a JSON validation tool (such as https://jsonlint.com) to check the syntax.
In particular, note that items listed inside braces { } or brackets [ ] must be separated by commas , but there must not be a comma after the last item in the list, before the closing brace/bracket.
The properties that can be included in the manifest.json are described below, starting with those that are mandatory:
| Property | Required | Description |
|---|---|---|
| version | Yes |
Specifies the manifest schema version. Currently this should be set to 0. |
| meta | Yes |
Specifies the manifest metadata. It is not used by the app, and should use the settings given in the example file below, i.e.:
"meta": {
    "name": "DEFAULT",
    "brandVersion": "n/a"
    }
|
| images | Yes |
Specifies the files to use for the custom background, logo and jumbotron images on the landing page, using the format:
"images": {
    "background": "./background.jpg",
    "logo": "./logo.svg",
    "jumbotron": "./jumbotron.jpg"
    }
The actual file name of each of image does not matter. The "images" property must be specified; if there aren't any images to include you must specify an empty list: "images": {} For more information on image size and format, and using different background images for different screen sizes, see Images. |
| translations | Yes |
Specifies any supported languages that have been customized, and/or any additional languages, along with the files that provide the translations for each, in the format:
"translations": {
    "en": "./en.json",
    "af": "./af.json"
    }
The "translations" property must be specified; if there aren't any translations to include you must specify an empty list: "translations": {} |
| applicationConfig | No |
Specifies any overrides of the application's default settings. For full details, see Overriding the default application settings. |
| appTitle | No |
Specifies the text that appears on the browser tab when using the Pexip web app. |
| availableLanguages | No | Restricts which of the supported languages and additional languages are available to users. When this option is specified, if a user's browser is set to use a language not included in the availableLanguages list, the default en.json is used. Additionally, the languages available to users from within the menu is restricted to only those specified in the availableLanguages list. This option can be used if, for example, administrators edit their language files to use specific terminology and want to limit the number of language files they need to maintain. For example: "availableLanguages": ["en", "af"] When this optional setting is not included, all supported and additional languages are available to users. |
| backgroundColor | No | Specifies the landing page's background color if no background image is specified |
| brandName | No |
Specifies the text that appears under the "header": "Welcome to {{brandName}}" You can edit the rest of the text on the jumbotron using the translation file — see Text on the landing page "jumbotron". |
| colorPalette | No | Specifies the range of colors used for interactive elements of the user interface, such as buttons and text |
| defaultUserConfig | No |
Specifies the defaults to use for the options that are configurable by the user, including the image used when background replacement is enabled. For full details, see Overriding the default user-configurable settings. |
| overlay | No |
Determines the contrast between the background and overlay text. Options are:
|
| overlayOpacity | No | Determines the degree to which the background image is darkened or lightened. This must be a decimal number between 0.1 and 0.9. |
| plugins | No | Specifies which plugins are available. For more information on implementing plugins, see |
| favicon | No |
Specifies the image file to use for the favicon, using the format: "favicon": {
"href": "./favicon.webp"
}
The actual file name does not matter. Supported formats are .ICO, .SVG, .WEBP, and .PNG. This option cannot be configured via the branding portal. |
| No |
Enables and specifies details of an additional step in the join flow that can be used to display a card with additional information, and an optional confirmation, to users. The card comprises:
The format is:
"customStepConfig": {
    "active": true,
    "subTitle": true,
    "width": "80%",
    "height": "80%",
    "mobileHeight":"100%",
    "mobileWidth": "100%",
    "source": {
        "default": "./index_default.html",
        "en": "./index_en.html",
        "de": "./index_de.html"
        },
    "confirmation": "checkbox",
    "mandatory": true
    }
where:
|
Overriding the default user-configurable settings
The defaultUserConfig section of the manifest file specifies the defaults to use for the options that are configurable by the user. Options include:
| alwaysDisplayUIInterfaces | Determines whether the call controls remain visible at all times (true) or fade away after a few seconds of inactivity (false). |
| backgroundBlurAmount |
Controls the level of blurring when background blur is enabled. Valid values are between 0 and 100, with a default of 16. As the value increases, the level of local processing increases but the difference in blur becomes less noticeable. Thus, we do not recommend setting this value too high. |
| bgImageUrl |
The URL of the default image used when background replacement is enabled by the user. When specified it replaces the inbuilt default image:
You can also use bgImageAssets which allows you to specify multiple alternative replacement images that the user can choose from. |
| callType |
Determines whether the participant can send or receive audio, video and presentation. Options are specified using the call type format. If this value is not set, or the specified format is invalid, the default AudioSendRecvVideoSendRecvPresentationSendRecv (full send and receive video, audio and presentation) is used. |
| cursorCapture |
Determines whether the application captures the cursor when the display surface is being shared. Available values:
|
| disableKeyboardShortcuts | Determines whether keyboard shortcuts are available to the user (false) or disabled (true). |
| displaySurface |
Determines which display surface to show first by default in the share screen / screen capture prompt. Available values:
|
| Determines whether users are presented with a confirmation message (true) or no message (false) when they attempt to close the browser window or tab in which the web app is running. | |
| enforceAudioMute | is true to always have a user's microphone muted by default when joining a meeting. This can be changed by the user in Additional settings. Note that this setting overrides the muteMicrophone parameter in preconfigured meeting links. |
| enforceVideoMute | is true to always have a user's camera turned off by default when joining a meeting. This can be changed by the user in Additional settings. Note that this setting overrides the muteCamera parameter in preconfigured meeting links. |
| isAudioInputMuted |
Determines whether the user's microphone is muted (true) or not muted (false) the first time they join a meeting from a new domain or subdomain. If the user enables or disables their microphone during the meeting, its muted/unmuted state is remembered by the browser and applied to their next meeting from that same domain/subdomain. Note that enforceAudioMute takes priority over isAudioInputMuted. |
| isVideoInputMuted |
Determines whether the user's camera is on (true) or off (false) the first time they join a meeting from a new domain or subdomain. If the user enables or disables their camera during the meeting, its on/off state is remembered by the browser and applied to their next meeting from that domain/subdomain. Note that enforceVideoMute takes priority over isVideoInputMuted. |
| mirrorSelfview | Determines whether the user's self view is shown to the user mirrored (true) or as other participants will see it (false). |
| preferPresInMix |
Determines whether the Prefer presentation in mix option is enabled (true) or disabled (false) by default. For more information, see Prefer presentation in mix. |
|
Determines which, if any, background effect is applied. Options are:
|
|
| showParticipantAuthenticatedState | is true to enable Show authenticated participants by default. This can be changed by the user in Additional settings. |
| showSelfView | Determines whether the user's self view is shown (true) or hidden (false) by default. |
| stopCameraAsMute |
Determines whether, when a user mutes their video, the web app releases the camera (true — default) or retains control of the camera (false). You may wish to set this to false to prevent other applications from taking control of the camera while the webapp video is muted. |
| surfaceSwitching |
Determines whether the user is offered an option to dynamically switch the captured display surface. Available values:
|
|
|
|
Overriding the default application settings
The applicationConfig section of the manifest file specifies any overrides of the application's default settings. Options include:
| audioProcessing |
Determines whether the advanced audio features are enabled. These features include the detection of audio when a microphone is muted (which triggers the "Trying to speak? Your microphone is muted” in-call notification, and the notification when testing a muted microphone before joining a call), and the software-based noise suppression feature. This option is enabled by default; to disable these features, set: "audioProcessing": false |
| availableCallTypes |
An array that determines the options presented to the user when they select before joining a call. These options determine whether the user can send or receive audio, video or presentation when in the call. Options are specified using the Call types format. Options appear to users in the same order as they appear in the array. For example, to offer Presentation only, Audio only, and Video (in that order), set: "availableCallTypes": ["PresentationSendRecv", "AudioSendRecvPresentationSendRecv", "AudioSendRecvVideoSendRecvPresentationSendRecv"] If this value is not set, or the specified format is invalid, the default AudioSendRecvVideoSendRecvPresentationSendRecv (full send and receive video, audio and presentation) is used. To disable the button, set: "availableCallTypes": [] The heading and description text for each option can be changed via the joining-options[...] tokens within the media section of the language file — for more information, see Joining options headings and description. |
| bandwidths |
An array that specifies the bandwidths to use for the Low, Medium, High, and Very High options, when a user selects the bandwidth to use for their call. The array must contain 4 values. The values do not need to be in numerical order; the lowest value in the array will be applied to the Low option, the second lowest to the Medium option, and so on. Note that the actual bandwidth limit for any given call will be the lower of either the value set within the app, or the value set for the service (VMR) being called (which if not set specifically is the global bandwidth). For example: "bandwidths": ["576", "1264", "2464", "6144"] |
| bgImageAssets |
Specifies one or more default background images that users can choose from when enabling the background replacement feature. You must include each image's path — for more information, see Default participant background replacement images. |
| disconnectDestination |
Specifies the URL to which users are directed when a call is completed (instead of returning to the app home page). If users have browser close confirmation enabled (via either their user settings, or as a default setting), they may be shown a confirmation pop-up when redirected to the |
| feedback |
Enables and disables the option under for users to send feedback to a specified URL. By default, this option is enabled and the URL is https://www.pexip.com/feedback. The format is:
"feedback": {
    "enable": true,
    "url": "https://www.pexip.com/feedback"
    }
|
|
Enables support for features (such as plugins) that require authentication to a third party using an OAuth 2.0 / OpenID Connect flow, with a redirect destination of webapp3/oauth-redirect. This option is disabled by default; to enable it set: "handleOauthRedirects": true |
|
| hiddenFunctionality |
Specifies any UI elements that should be hidden, using the element's data-testid. To find the data-testid of an element, right-click on the element and select . From the panel on the right select the tab. The code expands to show the definition of the element; from within this find the data-testid and copy the value. Common options include:
Values must be specified within an array, for example: "hiddenFunctionality": ["add-participant", "link-mute-all-guests"] |
| logLevel |
This option is set to info by default. You may want to change this depending on your log requirements. The options are:
|
| media | |
| monitorTypeSurfaces | Set this value to "exclude" to prevent users from sharing their whole screen, allowing only windows and tabs to be selected. |
| node |
(Only required if you are hosting the web app on an external server) The FQDN of the Conferencing Node to which requests should be sent. You can only specify a single address. |
| privacyPolicy |
Specifies the URL to which the link under is directed. By default, this is https://www.pexip.com/privacy but you can change this to your organization's own specific privacy policy. You can change the URL for all users, or you can specify different URLs depending on the user's browser language. For example:
"privacyPolicy": {
    "en": "https://www.pexample.com/privacy",
    "es": "https://www.pexample.es/privacidad",
    "fr": "https://www.pexample.fr/confidentialité"
    }
|
| shouldMaskConference |
Determines whether the meeting name remains visible in the URL after joining (e.g. .../meet.alice, or is encoded (e.g. .../73dca0e3-8d52-880c-4ca3-a938c88a00af) so that any screenshots of the meeting do not reveal the meeting name. This option is disabled by default; to enable it set: "shouldMaskConference": true |
| showLiveCaptionsFeature |
Determines whether the option to enable live captions is available to users. This option is enabled by default where supported; to hide this option from users, set: "showLiveCaptionsFeature": false |
| showTermsAndConditionsLink |
Determines whether the "terms and services" text is shown on the user name step of the join flow. By default the wording used is "By continuing you confirm that you agree to our terms and services", however you can change the wording via the language file by editing the "next-terms-and-conditions" value. This option is enabled by default; to disable it set: "showTermsAndConditionsLink": false |
| termsAndConditions |
Specifies the URL to which the "terms and services" text on the user name step of the join flow is directed.
"termsAndConditions": {
    "en": "https://www.pexample.com/terms",
    "es": "https://www.pexample.es/terminos",
    "fr": "https://www.pexample.fr/termes"
    }
|
| transferTimeout |
Determines the length of time in seconds that the transfer modal is shown to Webapp3 users being moved to or from a breakout room. The default is 15. Valid values are 0-120. If you do not want the modal to appear, set this value to 0. For example: "transferTimeout": "0" |
| videoProcessing |
Determines whether the option to blur their background is available to users. This option is enabled by default where supported; to hide this option from users, set: "videoProcessing": false |
|
|
|
Call types
A call type determines whether each of audio, video and presentation is enabled or disabled for sending and receiving when a user is placing a call.
Call types specify what is enabled, using the following format:
AudioSendRecvVideoSendRecvPresentationSendRecv
where:
- each of
Audio/Video/Presentationmust be included for that media type to be available - when any of
Audio/Video/Presentationare included, they must appear in that order - if only one of
SendorRecvis included after a media type, that media will be available in that direction only - if neither
SendnorRecvis included after a media type, that media will not be available - when both
SendandRecvare included, they must appear in that order.
In all cases, the participant can still access the conference controls and chat.
This format was introduced in v39. Previous formats continue to be supported.
Some common call types and their pre-v39 equivalents are given in the table below:
| Call type | Description | Pre-v39 |
|---|---|---|
| AudioSendRecvVideoSendRecvPresentationSendRecv | Joins as a full participant, able to send and receive audio, video and presentation. | 126 ("video") |
| AudioSendRecvPresentationSendRecv | Joins as an audio-only participant, i.e. the user will not send or receive any video, but can send and receive audio and presentation. | 102 ("audioonly") |
| PresentationSendRecv | Joins as a presentation and control-only participant, i.e. the user will not send or receive any audio or video, but can send and receive presentation. | 96 ("presentation-only") |
| AudioRecvVideoRecvPresentationRecv | Joins as a control-only participant who also receives the meeting audio, video and presentation. | 116 ("audiovideorecvonly") |
| none | Joins as a control-only participant, i.e. the user will not send or receive any audio, video, or presentation. | 0 ("none") |
Call types are used in the following situations:
| When | How |
|---|---|
| To specify the call type used to join a call when joining via the standard web app join flow | Via the defaultUserConfig callType setting |
| To specify the call type used to join a call when joining via a preconfigured URL | Via the ?callType= URL parameter |
| To specify the list of call types offered to users via the button | Via the applicationConfig availableCallTypes setting |
| When setting the text used to describe the | Via the joining-options[...] tokens in the media section of the language file |
Example manifest
An example manifest.json file that you can copy and edit for your own use is given below:
{
    "version": 0,
    "meta": {
        "name": "DEFAULT",
        "brandVersion": "n/a"
        },
    "brandName": "Pexip Web App",
    "backgroundColor": "#181818",
    "colorPalette": [
        "#E9F2FB",
        "#A3C8EE",
        "#5C9FE1",
        "#2475C5",
        "#174B7F",
        "#0A2138",
        "#0A2035",
        "#091E33",
        "#091D30",
        "#081B2E",
        "#08192B"
        ],
    "overlay": "light",
    "overlayOpacity": 0.9,
    "images": {
        "background": {
            "xs": "./bg_xs.jpg",
            "sm": "./bg_sm.jpg",
            "md": "./bg_md.jpg",
            "lg": "./bg_lg.jpg",
            "xl": "./bg_xl.jpg"
            },
        "logo": "./logo.svg",
        "jumbotron": "./jumbotron.jpg"
        },
    "translations": {
        "en": "./en.json"
        },
    "defaultUserConfig": {
        "backgroundBlurAmount": 16,
        "isAudioInputMuted": true,
        "isVideoInputMuted": true,
        "showSelfView": true
        },
    "applicationConfig": {
        "disconnectDestination": "https://www.meet.pexample.com",
        "bgImageAssets": [
            "/webapp3/branding/bg_light.jpg",
            "/webapp3/branding/bg_dark.jpg",
            "/webapp3/branding/bg_mid.jpg"
            ],
        "showLiveCaptionsFeature": false,
        "bandwidths": [
            "576",
            "1264",
            "2464",
            "6144"
            ],
        "termsAndConditions": {
            "en": "https://www.pexample.com/terms",
            "es": "https://www.pexample.es/terminos",
            "fr": "https://www.pexample.fr/termes"
            }
        },
    "appTitle": "Pexip",
    "plugins": [
            {
                "src": "./<path-to-your-plugin>/index.html"
            }
        ]
    }
Images
Specifying image locations
When creating a branding package, you can save your images within the webapp3/branding folder or you can create a subfolder within it (e.g. webapp3/branding/images) and save your images there. Either way, when you then reference those images from within the manifest.json you must reference the image's location as follows:
-
For all images apart from those referenced in "bgImageAssets", you must provide the path of the image relative to the webapp3/branding folder.
For example, if image.jpg is located:
- in the webapp3/branding folder, you should reference it as "./image.jpg"
- in a webapp3/branding/images folder, you should reference it as "images/image.jpg"
-
For any "bgImageAssets" images, you must include the path, including the / character, to which the branding package will be applied.
For example, if image.jpg is located:
- in the webapp3/branding folder and this package is used for the default ("webapp3") path, you should reference it as "/webapp3/branding/image.jpg"
- in a webapp3/branding/images folder and this package is used for the default ("webapp3") path, you should reference it as "/webapp3/branding/images/image.jpg"
- in the webapp3/branding folder and this package is applied to a new "sales" path, you should reference it as "/sales/branding/image.jpg"
- in a webapp3/branding/images folder and this package is applied to a new "sales" path, you should reference it as "/sales/branding/images/image.jpg"
Landing page background image
You can specify a single image, or different images to be used for different screen sizes / breakpoints.
-
To specify a single background image used for all screen sizes / breakpoints, use a string that contains the URL of the image, for example:
"images": { "background": "images/background.jpg" } -
To specify different images used depending on the screen size / breakpoints, use an object with the properties xs, sm, md, lg, and xl. The properties represent breakpoints; each property value is a string that contains the URL of the image displayed at that specific breakpoint.
The viewport width range that the breakpoints represent are as follows:
- xs: 0px - 478px
- sm: 479px - 743px
- md: 744px - 1024px
- lg: 1025px - 1999px
- xl: 2000px and up
At least 1 breakpoint property should be defined on the object, but not all need be set. If just the xs and md breakpoints are set, the breakpoint in between (sm) will use the larger (md) image. If the larger breakpoints above md are not set, they will fallback to using the md image.
For example:
"images": {
    "background": {
        "xs": "images/background_1.jpg",
        "sm": "images/background_2.jpg",
        "md": "images/background_3.jpg",
        "lg": "images/background_4.jpg",
        "xl": "images/background_5.jpg"
        }
    }
Supported file formats are:
- .JPG
- .JPEG
- .PNG
- .WEBP
Background image files
- resolution: 1920x1080
- size: 500-600 kB
For other images, there are no specific requirements but for best results we recommend matching the image width to the highest value of the breakpoint to which it is applied. For example, for the md breakpoint you should use an image that is around 1024px wide.
We also recommend that images used for lower breakpoints are portrait rather than landscape.
Jumbotron image
This file must meet the following requirements:
- resolution: 640x360
- size: 70-140 kB
- format: .JPG, .JPEG, .PNG or .WEBP
Logo
This file must meet the following requirements:
- transparent
- maximum displayed width: 168px
- maximum displayed height: 80px
- format: we recommend .SVG
Default participant background replacement images
The background replacement feature allows a video participant to replace their background with an image they select — either from a set of default images that you specify (as described below), or an image they upload themselves.
To include default background replacement images for all users in your deployment, save the files you wish to use in the webapp3/branding folder (or a subfolder that you create) and then edit the manifest.json to specify the path of each image using the "bgImageAssets" value within the applicationConfig section.
For example, if you have saved the images within the branding package in the webapp3/branding folder and this branding is to be applied to a sales path, then you should specify the images as follows:
"bgImageAssets": [
    "/sales/branding/bg_light.png",
    "/sales/branding/bg_mid.jpg",
    "/sales/branding/bg_dark.jpg"
    ]
If your branding includes default background images and you want to apply it to more than one path, you must create a separate branding package for each path, and edit the manifest.json for each.
These files must meet the following requirements:
- images must be at least 432 pixels high, and 768 pixels wide
- supported formats are .JPG, .JPEG, .PNG and .WEBP
- we recommend you use high-definition images
Note that the "bgImageUrl" value within the defaultUserConfig section of the manifest file can also be used to specify an alternative to the inbuilt default image that can also be selected by the user for background replacement:

Languages/text used in labels and messages
Webapp3 natively supports over 20 of the most popular languages. If
See Language support for a complete list of the languages currently supported.
You can limit which languages are supported via the availableLanguages option in the manifest file.
You can change any of the text that is displayed in the application (either in the default English or any of the supported languages), and you can add additional languages. Each language references a .json dictionary file containing a list of token and text string pairs.
- To change the text of a supported language you create a new .json file for that language that contains the strings you wish to change.
- To add a new language you create a new .json file for that language.
All .json files must be placed in the webapp3/branding subfolder and referenced in the translations block of the manifest file.
Right-to-left (RTL) languages
The web app interface supports languages that are written from right to left such as Arabic and Hebrew. Although Pexip provides native support for Arabic and Hebrew, not all RTL language translations are included by default. The interface will automatically adapt, however, if you supply a custom language file with an RTL locale code such as fa (Farsi).
The exception is if you are customizing the custom step using an HTML file, in which case you must include dir="rtl" and the language code within the <html> tag. For more information see Body of the custom step.
Editing a language file
Each language file contains a list of token and text string pairs. The token remains the same in all language files and the associated string contains the text that is displayed in the app when that language file is used.
The full set of token and text string pairs for each supported language is available from https://docs.pexip.com/files/webapp3_languages/v39/<language>.json where <language> is the ISO standard code for the language. For example, the link for the default English file is https://docs.pexip.com/files/webapp3_languages/v39/en.json. You can download this file to use as the basis of your new or edited language files (you may need to right-click and select Save link as...).
To change the text that is displayed, simply search in the language file for the text that needs to be changed, edit the text string, and save your changes back to the same file. Do not change the token names.
For example, in the default en.json the "Please enter a display name so other people know who's in the meeting" string is located in the "username" block and is associated with the "usage-purpose" token:
"username": {
    ...
    "usage-purpose": "Please enter a display name so other people know who's in the meeting",
    ...
    }
The strings are generally grouped together according to where or when they are displayed. For example, all tokens in the "add-participant" block refer to strings that appear when you are adding a participant to the meeting.
The edited language file does not have to contain the complete set of tokens / text strings. You only need to include the token and text string pairs that you want to be different from the default strings for that language.
Changing the default (English) strings
You can use your own alternative English strings instead of the default strings. To do this, download the default en.json file from https://docs.pexip.com/files/webapp3_languages/v39/en.json (you may need to right-click and select Save link as...), and edit the strings as required. You only need to include the token and text string pairs that you want to be different from the default strings. Do not change the token names.
Then save the en.json file in the webapp3/branding folder and reference it in the translations block of the manifest, in the same way as you would when Adding additional languages.
Changing translations for other supported languages
The Webapp3 is available in a selection of other languages. We've provided the translations for you, but you can use your own alternative strings for each language instead. To do this:
-
Download the relevant language file from https://docs.pexip.com/files/webapp3_languages/v39/<language>.json where <language> is the ISO standard code for the language, for example de for German.
- Edit the strings as required. You only need to include the token and text string pairs that you want to be different from the default strings for that language. Do not change the token names.
- Save the file with the appropriate file name (for example, de.json for any German changes) in the webapp3/branding folder and reference it in the translations block of the manifest, in the same way as you would when Adding additional languages.
Adding additional languages
The Webapp3 is available in English and a selection of other languages. You can add additional languages as follows:
-
Create a new <language>.json file in the webapp3/branding folder:
- Download the default en.json file as a basis for the new language.
-
Rename the new file as appropriate for your new language, for example af.json for Afrikaans.
We recommend using the ISO standard language codes/locales for the filename as this allows that language file to be used automatically if its name matches the browser's default language. Always use .json as the filename extension.
The app also supports different language cultures via branding. For example, it can distinguish between French (fr-FR.json), French Canadian (fr-CA.json) and French Belgian (fr-BE.json).
- Edit the text strings as appropriate for the new language, leaving the token names unchanged.
- Save the file in the webapp3/branding folder.
-
Edit the manifest.json file to add a reference to the new language by updating the translations block to include the new language file, for example:
"translations": {
    "en": "./en.json",
    "af": "./af.json"
    }
Now, if a user's browser is set to use Afrikaans, they will see the text strings from the af.json file. Any strings not specified in af.json are shown in the default English.
Tags
Some of the text strings contain tags, for example <0>…</0>, <1>…</1>, etc. These tags are used by the app for formatting purposes, for example by changing the text to bold, by adding a hyperlink to the text, or by inserting the text into a button.
You must retain the tags, but you can translate any text within the tags into your chosen language.
You cannot create your own tags.
Variable substitutions
Some strings contain variable substitutions. Variables always take the format {{<variable name>}}. For example:
"remove-user-confirmation": "Are you sure you want to forcibly eject {{userName}} from this meeting?"
This message appears when a user disconnects a participant. In this case, the application automatically substitutes {{userName}} with the participant's actual name as shown in the participant list.
When translating text strings containing variables, you must not translate the names of the variables or change the formatting — the braces {{ }} and the text within them must be left unchanged.
You cannot create your own variables.
Error messages
There is a list of error message in the language file. These messages typically relate to connectivity issues between the Conferencing Node and Pexip apps, or to conference activities.
The token name is in the format "code[#pex###]", which is used as a common reference for the message regardless of the language used in the message string, for example:
"code[#pex121]": "A host ended the meeting"
You can change these messages in the same way as you can change the other messages — edit the display text part only; do not change the "code[#pex###]" token name part.
Joining options headings and description
By default, when users are joining a meeting they are offered alternatives to joining with full video (for example, joining with audio only, or as a presentation-only participant). You can change the heading and text that is used to describe each option via the joining-options[...] tokens within the media section of the language file, where the format described in Call types is used to specify each option.
For example, the default options are:
"media": {
    "joining-options[PresentationSendRecv]": {
        "description": "You can control the meeting, share and see shared content",
        "title": "Presentation only"
    },
    "joining-options[AudioSendRecvPresentationSendRecv]": {
        "description": "You will not send or receive video",
        "title": "Audio only"
    },
    "joining-options[AudioSendRecvVideoSendRecvPresentationSendRecv]": {
        "description": "A meeting with video and audio",
        "title": "Video"
    }
}
You can control which options are offered and in which order, via the availableCallTypes setting.
Text on the landing page "jumbotron"
The "infocard" block of the language file specifies the text that appears underneath the "jumbotron" image on the left side of the landing page. By default this uses the brandName variable configured in the manifest.json file. You can edit both the header and body text:
"infocard": {
    "meeting": {
        "body": "A secure video communications platform",
        "header": "Welcome to\n {{brandName}}"
        }
    }
Text of the custom step
The "custom-step" block of the language file specifies the text that appears in the fixed elements (e.g. title, button, checkbox label) of the card displayed when the optional additional customized joining step is enabled.
To use a custom joining step and to set its contents you must first include the optional customStepConfig block in the manifest.json file, and then include in the webapp3/branding folder the files that are referenced within the source block, which supply the body of the custom step. You can also change the wording of the other elements of the custom step via the
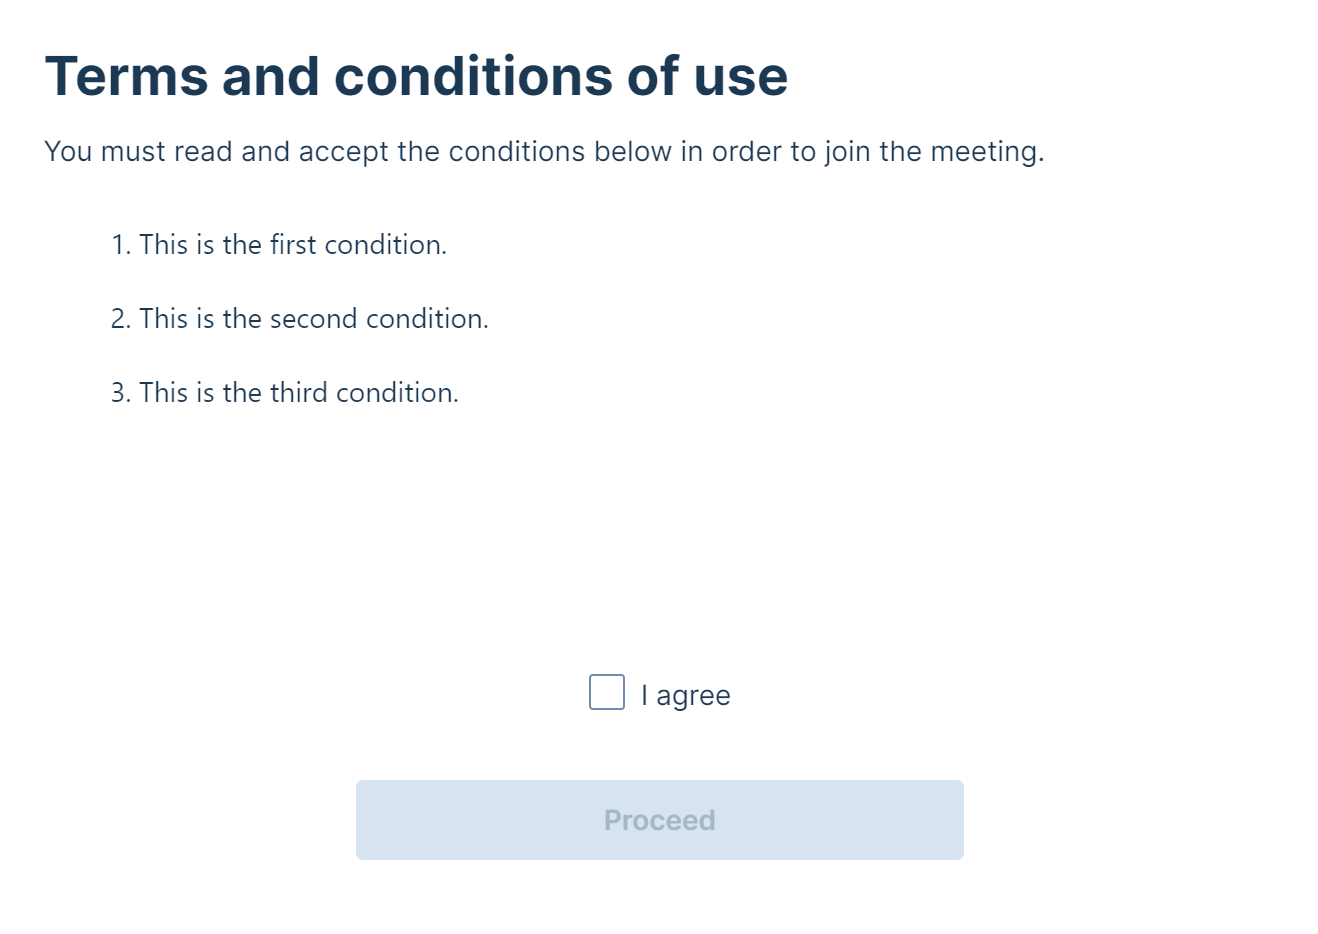
The example below shows an edited "custom-step" block used to produce the example shown in Body of the custom step:
"custom-step": {
    "checkbox": {
        "aria-label": "Click to agree",
        "caption": "I agree"
        },
    "content-frame": {
        "title": "Content"
        },
    "next": "Proceed",
    "subtitle": "You must read and accept the conditions below in order to join the meeting.",
    "title": "Terms and conditions of use"
    }
Body of the custom step
To use a custom joining step and to set its contents you must first include the optional customStepConfig block in the manifest.json file, and then include in the webapp3/branding folder the files that are referenced within the source block, which supply the
The content that is shown within the body of the custom step can be an HTML file, text, an image, a video, or anything else that can be displayed inside an iframe.
You can define different content files for different languages — for more information, see source.
The example below is an HTML file that displays pre-meeting terms and conditions as a set of numbered items. This can be used in conjunction with a checkbox to require that the user confirms they have read and agree to these conditions before they can proceed.
If you are defining an HTML file to display text in a right-to-left language, you must include dir="rtl" and the language code within the <html> tag. For example, for Arabic, you should replace:
<!DOCTYPE html>
<html>
with
<!DOCTYPE html>
<html dir="rtl" lang="ar">
<!DOCTYPE html>

<html>
  <head>
    <meta http-equiv="Content-Type" content="text/html; charset=utf-7">
    <style>
      ::-webkit-scrollbar {
        width: 8px;
        height: 8px;
        overflow: visible;
      }

      ::-webkit-scrollbar-thumb {
        min-height: 18px;
        border-width: 1px 1px 1px 8px;
        border-radius: 20px;
        background-color: #a5b8ca;
        background-clip: padding-box;
      }

      ::-webkit-scrollbar-button {
        width: 0;
        height: 0;
      }

      ::-webkit-slider-thumb element .b-w::-webkit-scrollbar-track {
        border: solid transparent;
        border-width: 0 0 0 6px;
        background-clip: padding-box;
      }

      ::-webkit-scrollbar-track {
        border: solid transparent;
        border-width: 0 0 0 6px;
        background-clip: padding-box;
      }

      ::-webkit-scrollbar-corner {
        background: 0 0;
      }

      ::-webkit-scrollbar-track-piece {
        background: transparent;
      }
      body {
        color: #1e3a54;
        font-size: 14px;
      }
    </style>
  </head>
  <body
    style="
      font-family: Inter, -apple-system, BlinkMacSystemFont, Segoe UI,
        Roboto, Oxygen, Ubuntu, Cantarell, Fira Sans, Droid Sans,
        Helvetica Neue, sans-serif;
    "
  >
    <ol>
      <li>
        This is the first condition.
      </li>
      <br />
      <li>
        This is the second condition.
      </li>
      <br />
      <li>
        This is the third condition.
      </li>
    </ol>
  </body>
</html>
When the example above is used in conjunction with the example "custom-step" block of the language file given in Text of the custom step, the result is the following:
Uploading the branding package
When you have prepared your files, ZIP the folder containing the webapp3/branding folder. It is this zipped folder that you then upload to the Management Node.
More information
Participant avatars cannot be branded via the web app, but they can be controlled by using external policy or by configuring user records. For full details about how to integrate Pexip Infinity with an external policy server, see Using external and local policy to control Pexip Infinity behavior.
In addition to customizing the appearance of the web app, you can also use themes to change the voice prompts and images provided to participants when they are accessing a Virtual Meeting Room, Virtual Auditorium or Virtual Reception.
If any further information on customizing Pexip Infinity is required, please contact your Pexip authorized support representative.