Enabling live captions
The live captions feature converts live meeting audio into text captions which are visible to all web app participants who have elected to view them. This topic describes how to configure Pexip Infinity and the AI Media Server (AIMS) to enable the live captions feature in Pexip Infinity VMRs, Virtual Auditoriums and gateway calls, including how to enable different languages for different VMRs in your Pexip Infinity deployment.
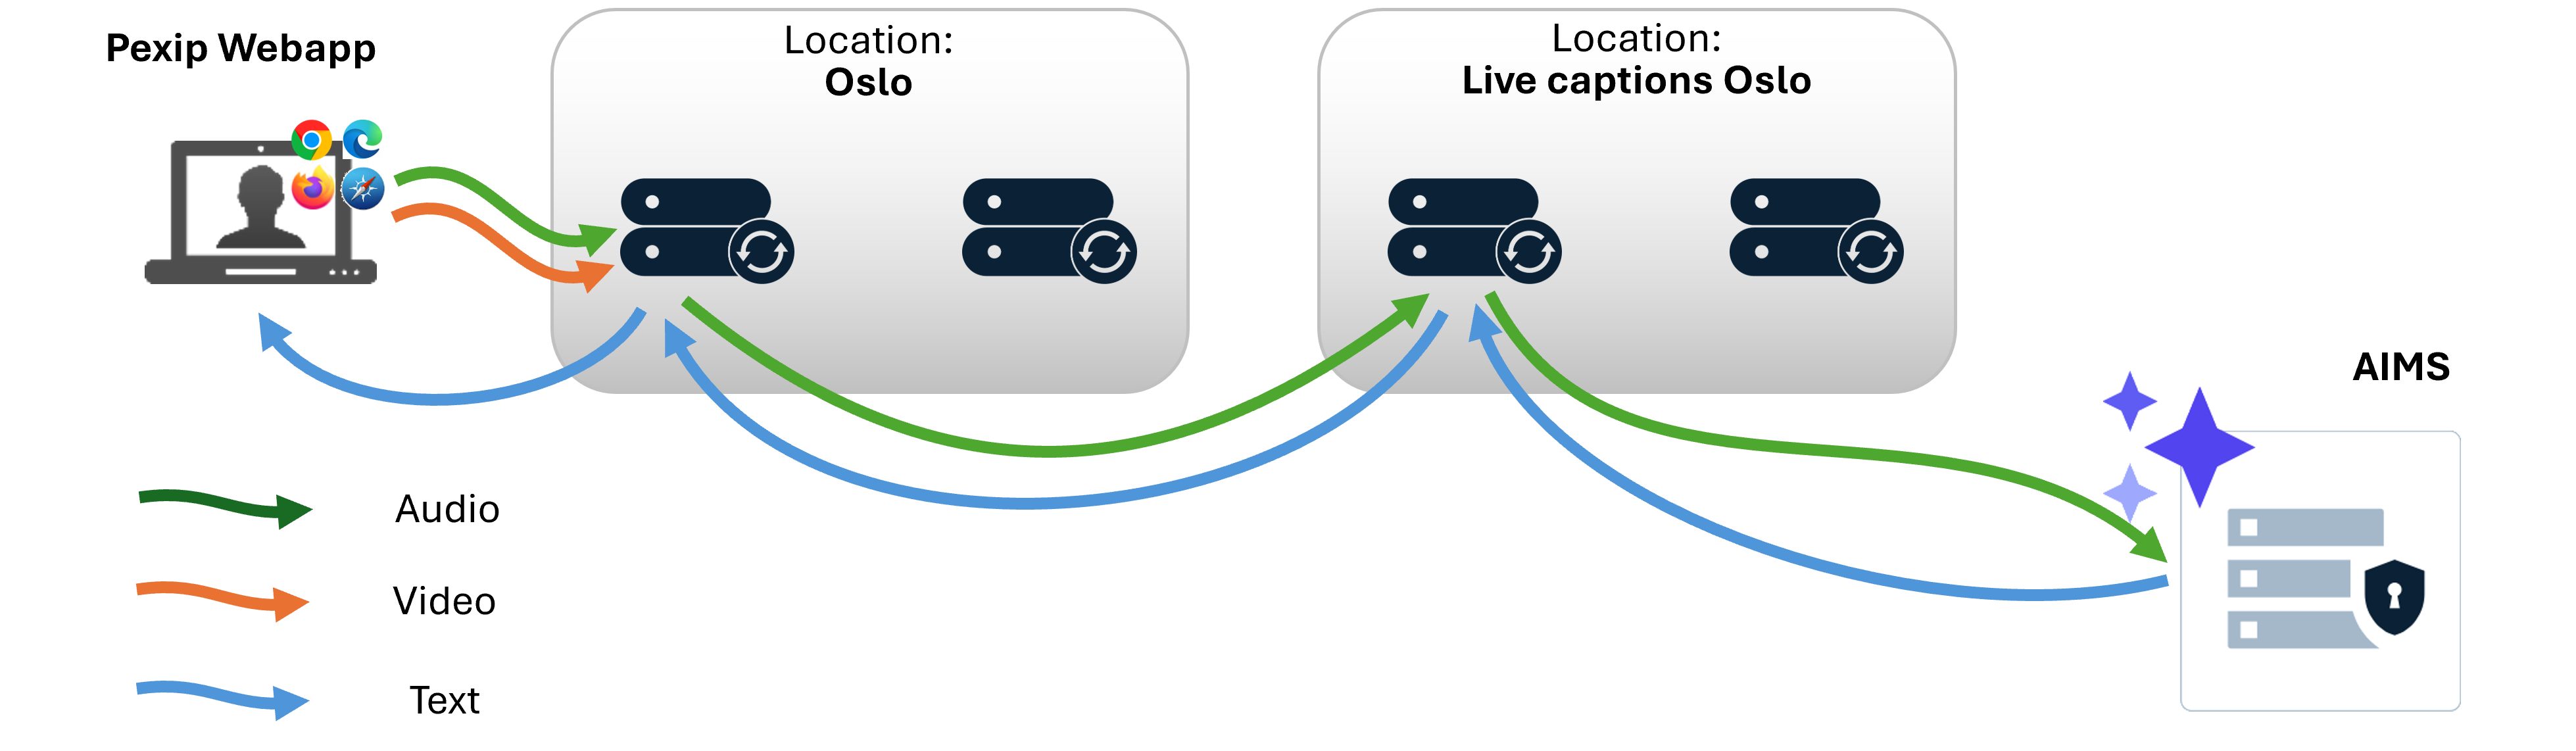
Diagram showing connections between Pexip Infinity and AIMS
When live captions are enabled by a participant in a VMR (or other service), the audio from the call is sent from the Conferencing Node that is handling the call, to a Conferencing Node in a dedicated live captions location. That Conferencing Node forwards the audio to AIMS, which transcribes it into text. The text is then returned back to the Conferencing Node in the live captions location, and on to the originating Conferencing Node, which then supplies it as a text overlay or transcript to all web app users in the VMR who have enabled live captions.
For a list of supported source languages in AIMS v2, see Configuring services and languages.
When implementing this feature note that:
- The captions are only shown to a web app user who has elected to view the captions using the
 toolbar button. However, all of the other meeting participants are notified that the call is being transcribed.
 - The button is only displayed in the web app when live captions are enabled on Pexip Infinity via global settings or on the relevant VMR or Call Routing Rule.
- The feature is not available for Microsoft Teams, Google Meet, or Skype for Business gateway calls.
-
Participants have the option to view captions either as ephemeral text overlaid on the main video, or from the Live Captions History panel, which provides a continuously updating view of all captions received while the participant has live captions enabled and is connected to the meeting. In the latter case, if a participant leaves and then rejoins a call, they will only see the captions shown since they rejoined.
-
Pexip Infinity does not log or retain the contents of any live captions transcripts.
The sections below describe how to configure Pexip Infinity (including adding AIMS as a media processing server, enabling the live captions feature, setting up the necessary system locations, and optionally setting the language for a VMR), and how to configure AIMS with information about the Pexip Infinity deployment connecting to it.
Infinity configuration
In these steps you configure your Pexip Infinity deployment to use one or more AIMS servers for media processing, and ensure that your VMRs and system locations are set up appropriately.
Adding a media processing server
To use AIMS, you must add one or more media processing servers to your Pexip Infinity deployment, configuring each with the details of a corresponding AIMS server.
When multiple AIMS servers are configured, they are treated as a pooled resource shared by all live captions system locations. When a user in a VMR initiates live captions, the request can be sent to any one of the AIMS servers. Subsequent request for live captions from the same VMR will be sent to the same AIMS server until it reaches capacity, at which point the next request is sent to another AIMS server in the pool.
To configure Pexip Infinity with information about an AIMS server to use to process media, go to and select .
Enter the following information:
| Option | Description |
|---|---|
| FQDN | The FQDN of the AIMS server used to process media. |
After you have added the server's FQDN, select . Pexip Infinity then assigns the server a unique Application ID (visible from the main page) and JWT public key (visible when the server is selected). These are the values required when configuring AIMS.
Enabling live captions on VMRs and other services
By default, all Virtual Meeting Rooms, Virtual Auditoriums and Call Routing Rules are able to offer live captions, so any Webapp3 participant using these services can enable them. You can change the availability of live captions globally, and override this on a per-service basis.
To change the default availability of live captions for all services:
- From your Pexip Infinity Management Node, go to .
- In the Service configuration section, select or clear the Live captions checkbox.
To configure the availability of live captions for an individual service (such as a VMR):
- From select the VMR.
- Scroll down to and expand the Advanced Options section. From the Live Captions drop down, select one of the following options:
- Use global live captions setting: live captions are only available for this VMR if the checkbox is selected.
- Yes: live captions are always available for this VMR.
- No: live captions are not available and cannot be enabled by participants in this VMR.
About system locations and AIMS
Each system location in your Pexip Infinity deployment has one or more nominated Live captions outgoing locations. When live captions are enabled on a VMR, the Conferencing Node that is handling the call connects to one of its own location's Live captions outgoing locations. A Conferencing Node in that live caption location will in turn connect to the AIMS server.
We strongly recommend using a dedicated pool of Conferencing Nodes in their own system location to handle connections to AIMS. All other system locations should then have their Live captions outgoing locations set to these AIMS-specific locations.
Live captions locations should not be used to handle calls, or as overflow locations.
Capacity planning
Every VMR that has live captions enabled requires at least one audio port of capacity in the live captions system location. Each Conferencing Node in the live captions system location can support up to 80 concurrent live-captioned VMRs.
For larger deployments (above 80 concurrent connections), we recommend:
- The Live captions outgoing location should have multiple Conferencing Nodes, sufficient to support an average maximum of 80 concurrent AIMS connections per node.
- Conferencing Nodes in the Live captions outgoing location should be "CPU optimized" machine types when using cloud instances, and have 8 CPU. A logical example template in AWS is the c5.2xlarge.
Examples
If your deployment has two existing system locations, London and Oslo, you may wish to create two new system locations, Live captions London and Live Captions Oslo. You then add one or more Transcoding Conferencing Nodes to each of these live captions locations.
You then configure the London location to use Live captions London as its first choice and Live Captions Oslo as its second choice for its live captions locations. Likewise, you configure the Oslo location to use Live captions Oslo as its first choice and Live Captions London as its second choice.
This would keep live captions traffic geographically local while allowing fallback to a secondary live captions location.
Alternatively, you could create a single Live captions location and configure all other system locations to use it as their Live captions outgoing locations first choice.
Creating and configuring a new live captions location
To create a new system location specifically for use as a live captions outgoing location:
- From , select .
- Configure the NTP server and DNS server fields as appropriate for your environment. All other fields should be left blank, or with their default settings.
- In the Live captions outgoing locations section, ensure that all choices are left blank.
- Select .
Configuring existing system locations
To configure each existing system location in your deployment to connect to the live captions outgoing location:
- From , select the location and scroll down to Live captions outgoing locations.
- Select the new live captions-specific location created above as the 1st choice. If you have created other live captions locations, select these as the 2nd choice and 3rd choice.
- Repeat for all system locations in your deployment.
Setting the language on an individual VMR
AIMS needs to know the language of the incoming audio stream in order to apply the appropriate language model. Generated live captions text are provided in the same language as the incoming (source) audio stream. AIMS v2 also includes a tech preview feature to translate the text generated from the source language into a different language and show this translation as the live captions text.
When configuring AIMS, you can set the default source language for all audio streams from the Pexip Infinity instance. If a default source language is not set, en-US is used.
From Pexip Infinity v36 and later, you can override the source language on a per-VMR / Virtual Auditorium / Call Routing Rule basis using external or local policy in combination with the service's service tag. An example of how to do this using local policy is described below.
Using local policy
The example below uses a combination of a VMR's service tag to specify the source language, and local policy to apply the selected language to the VMR's configuration.
We recommend that you apply the same local policy script to all locations in your Pexip Infinity deployment, so that you can use the service tag to specify the source language for any service.
Before you start, ensure you are familiar with the use of local policy as described in Enabling local policy.
-
Ensure that you have enabled the selected language in AIMS. See Setting the enabled language models.
-
From the Pexip Infinity Administrator interface, go to and select .
-
Enter a Name and optional Description.
-
In the Service configuration policy section, enable Apply local policy.
-
In the Script section that appears, enter the following (or incorporate this code into an existing local policy script):
Copy to clipboard{
{% if service_config %}
"action" : "continue",
{% if service_config.service_tag.startswith("show_captions:") %}
"result" : {{service_config|pex_update({
"source_language":service_config.service_tag.split(":")[1],
"live_captions_language":service_config.service_tag.split(":")[2]
})|pex_to_json}}
{% else %}
"result" : {{service_config|pex_to_json}}
{% endif %}
{% else %}
"action" : "reject",
"result" : {}
{% endif %}
} - Select .
- From select a Location.
- From the Policy profile field, select the policy profile created above and select .
-
Repeat the above steps to apply the policy profile to all other locations in your deployment.
- From the menu, select the VMR for which you want to set the language.
- Ensure that live captions are enabled for the VMR. To do this, from the Advanced options section, ensure that the Live Captions field shows either:
- Yes, or
- Use global live captions setting, in which case Enable live captions on VMRs and routing rules by default must be enabled.
-
From the Advanced options section, in the Service tag field enter the following:
show_captions:<source-lang>:<captions-lang>
where <source-lang> is the source language and <captions-lang> is the live captions language.
For AIMS v2, you can either:
-
use the same source and captions language to provide speech-to-text functionality.
For anything other than en-US this requires installation of the appropriate language bundle for the source language.
For example, if the source and live captions language is French:
show_captions:fr-FR:fr-FR
-
(tech preview) use different source and captions languages to provide speech-to-translated-text functionality.
This requires installation of the appropriate language bundle for the source language and installation of the aims-model-any-any-nmt-megatron language bundle (which must support the captions language). No further configuration is required; the transcription of the source language from speech to text, and the subsequent translation of the text into the captions language is automatic.
For example, to provide German captions if the source language is French:
show_captions:fr-FR:de-DE
For a list of supported source languages in AIMS v2, see Configuring services and languages.
-
-
Select .
To set the source language for any other VMR, Virtual Auditorium or Call Routing Rule in your deployment, ensure that live captions are enabled for the service and repeat the Service tag configuration. You can use different source languages for different services in the same Pexip Infinity deployment.
AIMS configuration
In this step you configure the AIMS server with details of the Pexip Infinity deployment that it will be processing requests from.
- Log in to the AIMS server as the user admin, either through SSH or the VMware console.
- At the command prompt, run:
aims-config infinity-instance-add
- At the prompt, enter a user-friendly name for this instance. This must be a single line with no spaces:
Infinity Instance Name (user-friendly):
- At the prompt, paste the file containing the Live Captions App-Id and Live captions JWT public key that you copied when configuring Pexip Infinity with a media processing server:
Paste the output from your Infinity node:
The format should be similar to the following:
{"appId":"00abc000-111a-1234-1abc-a11122b3c444","pubKey":"-----BEGIN PUBLIC KEY-----\naaBBccDD2211NNddejj22pp0044mmMMeEEpppqqJJ2jj2kkkkeeddii99EE11nneedjj==\n-----END PUBLIC KEY-----","defaultLanguageCode": "en-US"}